How to get a DOI for your teaching materials with Zenodo
By Reka Solymosi, Lecturer in Quantitative Methods, University of Manchester
Jump to:
GitHub
Choosing an open source license
Getting started with Zenodo
Find the repository you want to share
Get your repository ready on GitHub
Get that DOI
Academics face various pressures, from research teaching and administrative duties. The best way to create a positive culture in academia is to share. However, it may sometimes feel like there is no incentive to share teaching materials, if I have spent so many hours developing this work, why should I just hand it over to someone, “what’s in it for me?”
In a previous post, a group of us discussed why share, and some barriers to sharing. We concluded that sharing is easier when you can track who is using your materials, and receive credit for the work. One approach to achieve this for our GitHub materials, is to make use of Zenodo, in order to get a DOI and some credit for the teaching material we’ve developed, and also to be able to track who is using this material and where. In this post I will provide a step-by-step walkthrough of how to do this.
GitHub
Most of my colleagues that teach some form of computational social science, either at undergraduate, master’s level or at a summer school will use GitHub to develop a variety of materials: anything from tutorials to pieces of code and even a mix of slides. We use it because it allows us to be flexible about the type of content (i.e. not just slides), and continuously develop it through an iterative process and with feedback from others. If you have not used GitHub, but have been considering it, there are many nice tutorials for getting started with GitHub, for example the GitHub guides, or you can follow (or try to attend in person) a software carpentry session on version control with Git and GitHub. If you are an R user (and even if you are not), I particularly recommend Happy Git from Jenny Bryan from my alma mater, University of British Columbia.
Choosing an open source license
Once you have your teaching material on GitHub, it is ready to share. For example, I have my lab notes for our Crime Mapping module we teach at the University of Manchester Centre for Criminology and Criminal Justice. I have this in my repository, but also have the public-facing version created with bookdown available for students (and others) to view here. In this course we teach students all about the spatial nature of crime and related concepts, and show them how to make cool maps in R.
Note: before you start sharing, it is important to tell people how they can reuse your work. You can do this by including a license in your repository. To learn more about what license best applies for your particular case, check out choosealicense.com.

Getting started with Zenodo
Now that you have your teaching material on GitHub, leave it for a second, and head over to Zenodo at https://zenodo.org/. Click on “Log in” and choose the option “Log in with GitHub”

Log in with your GitHub username and password, and you will go to the next page where you will be asked to authorize Zenodo some access on GitHub. Authorize this access by clicking on the “Authorize zenodo” button. Note: if you have / are part of organizations you can also grant access to these, and can see which ones Zenodo may already have access to. However you will have to be the organization administrator, or ask the organization administrator to enable the third-party access for Zenodo.

You will receive a confirmation email, and it will ask you to click a “Confirm my account” link. Then you will be taken to your Zenodo landing page, which will look something like this:

On the top right hand corner you see a rectangle with your username (email address) on it, and next to it a little downwards arrow. Click this arrow, and then click on the option for GitHub:

This will take you to the GitHub section of your settings. You can also access this with a URL (https://zenodo.org/account/settings/github/) if you are logged in this should also work!
Find the repository you want to share
Now you should see a page that describes getting started in three steps, and a list of your repositories underneath.

Now you can see the step-by-step guide at the top of that page, in case you forget, but I will also walk through this here.
First, find the repository which you want to share, and “flip the switch” ie toggle the little on/off bar next to it by clicking on it.
Get your repository ready on GitHub
Then go back to GitHub and “create a release”. Creating a release is a way to provide packaged software, release notes, and binary files for other people to use. Releases are based on Git tags, which mark a specific point in your repository's history. Releases are ordered by the date they are created on GitHub. There is a very comprehensive tutorial by GitHub on how to create a release here.
First, go to your repository settings, and make sure you have created a webhook by toggling the “on” button next to your desired repository on Zenodo. Select settings > webhooks, and you should see a URL that starts with “zenodo.org”.

Now, to create a release, go back to the main page of your repository, and click on the releases tab:

When you do this, if you do not yet have a release for this repo, you will be greeted with the following message: “There aren’t any releases here. Releases are powered by tagging specific points of history in a repository. They’re great for marking release points like v1.0.“ Below this message is a button that says “create a new release”. Click this button.

Then you will be taken to the page to create your release. You will have to supply a version number (as this was my first release, I opted for v1.0 as suggested, but if you’re interested GitHub recommends you read up on good practice in semantic versioning). Then a title and a brief description of your release. Here I chose to use a title that describes the material and the academic year in which it was used, and a short note of the module and where it is taught for the description.

If this release is not production ready you can tick the box next to where it says “This is a pre-release” to let people know. In this case, you should add a pre-release version after the version name. Some good pre-release versions might be “v0.2-alpha” or “v5.9-beta.3”.
When you are all done, click the “publish release” button. You will then see your release published:

Get that DOI
Now, go back to Zenodo, and click on the “Upload” tab

You will see your new upload there:

If you click on the name of it, you will see all the details and an option to edit. But crucially, if you scroll down a bit, you will see your very own DOI:

And scroll even further down, it even generates a little citation for you:
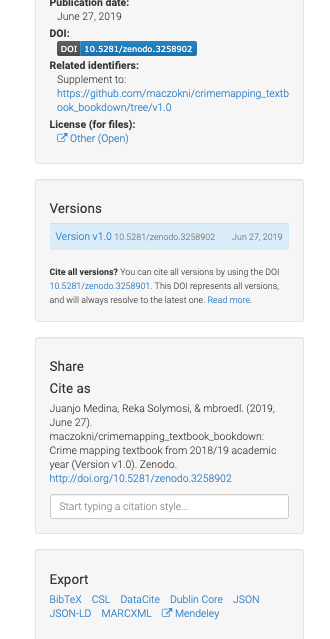
Exciting stuff! Now you can share your teaching material, and ask people to reference this when they make use of your work, allowing you to see who you may be helping when releasing your teaching material, and also to receive some credit or recognition for your hard work! Keep on sharing academia!
About
Reka is a Lecturer in Quantitative Methods with interests in data analysis and visualization, crowdsourcing, rstats, fear of crime, transport, and collecting data about everyday life. As a former crime analyst she is interested in practical applications to research and solving everyday problems with data.